
With all the new features that the updated DSM 7 brings with it, there are also some features that Synology has sadly dropped. This includes, for example, the official support for Java. Doesn't sound particularly dramatic at first, but the JDownloader app builds on it. After the update, you will definitely notice right away that it can no longer be started and can actually only be uninstalled. However, there are two workarounds that we would like to present to you in our tutorial so that your downloads may never dry up.
Current competitions:
Zenchilli Sweepstakes: Gigabyte M32U Monitor – UHD, 144 Hz & more (up to and including November 6th)
Win a gaming PC worth 1,500 euros (up to and including November 9th)
Win a gaming PC worth 2,500 euros (up to and including 11/14)
Install JDownloader in Docker
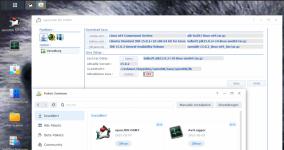
Option 1 is to simply set up a Docker container on your Disk Station, on which you install Java and thus run your favorite download app there. However, this is subject to some restrictions: You need a compatible NAS that can run Docker or virtualized environments at all. In other words, a system based on x86 or x64. So if your network hard drive has an Intel or AMD processor, you're already on the safe side here. If you're not sure which CPU is powering your NAS, open the Control Panel and navigate to the Info Center. You can read this in the "CPU" field.
Begin the procedure by installing Docker. To do this, open the Package Center, scroll down to Third-Party Packages and click the Install button on Docker.
You can safely close the welcome message and check the box "Do not show this warning again". Navigate to the "Registration" tab and search for "jdownloader" in the search field at the top right. Confirm with the enter key. In our example we install the package "jlesage/jdownloader-2". Select the package and click on the download button in the menu bar. Now you will be asked for the version you want to install. For the latest, choose "latest" and click the Select button.
You can now see the progress of the installation in the "Image" tab and can configure the container after the download is complete. This is necessary so that both your configuration and the downloads are secured outside the container. Otherwise you would have to start from scratch after each container restart. Select it and press the Start button.
Here you can now set the paths by opening the advanced settings. Select the "Volume" tab and add a directory for the configuration and the downloads using the "Add folder" button.
So create the following folders with the following mount paths:
output -> /outputconfig -> /config
Now the data can be stored outside of the container and will not be lost after a restart or update. Alternatively, you can also specify an existing folder on your NAS for the variable output at this point. It is important that the guest user has read and write rights to this folder. So the path could also look like this:
output -> /volume1/jdownloader
In addition, at least port 5800 must be specified in the port settings. It is best to enter 5800 for the local port here as well, so that you always know which port you can use to access the JDownloader web interface.
Confirm with the Apply button, click on "Next" and then on "Done".
If the container has started up successfully, you can reach the JDownloader web interface via the IP address of your NAS and port 5800. The address then looks something like this:
http://your.nas.ip.address:5800
Call this up via your browser so that you end up in the web interface of your JDownloader. Looks a bit shabby compared to the desktop version, but you're running the app in the so-called headless mode anyway, in which you add links directly from your browser using MyJDownloader.
That's what it's all about now. Click on "Settings" in the menu bar and select "My.JDownloader". Enter your access data there and click on “Connect”. If you don't have an account yet, you can do so using the button above.
If you have never come into contact with this browser extension, you can learn more about how to use it in the sections below of our JDownloader tutorial.
Once connected, you can use your browser to send links to the JDownloader in the Docker image on your Disk Station. The downloads can then be started directly via the MyJDownloader interface and end up directly in the "Output" folder. Of course you can name it something else as long as you don't change the mount path.
The Java method for smaller (or older) NAS
Not every Disk Station is able to install Docker. For example, the less powerful ARM or Realtek processors do not support virtualization - and therefore no apps that require it. But there is a solution for that as well, as long as it is just the JDownloader. Clear the stage for option 2.
Unofficially, it's still possible to install Java, albeit through a few detours. Start in Package Center and click the Settings button there. Select the "Package sources" tab, click on "Add", give the source a name and enter the following address as the location:
https://raw.githubusercontent.com/rednoah/java-installer/latest/syno-dsm7.json
Confirm with OK and close the settings window. Click the refresh button and go to the "Community" section. Here you will now find the “Java Installer”, which you can install with a button. You can confidently accept the message that this is third-party software.

Confirm the information about the successful installation with OK as well. From now on it gets a little more complicated. This is because the following steps are done through the SSH console. Open Control Panel, navigate to Terminal & SNMP”, tick “Enable SSH service” and note the port specified there – or choose your own.
Download an SSH client from the web, such as PuTTY. Select the appropriate download for your operating system and install the app. For a more detailed discussion of SSH access, see our post.
In the next step, connect to your Disk Station via SSH and log in with your username and password. The installation requires that you have administrator rights. Alternatively, you can log in as the root user by running the sudo su command and re-entering your password here.
First create a folder for installing JDownloader:
mkdir /volume1/@appstore/JDownloader
and then open it:
cd /volume1/@appstore/JDownloader
Do not change directories during installation. With the command
wget http://installer.jdownloader.org/JDownloader.jar
Download the app directly from the JDownloader website. Now all you have to do is start the tool with
java -jar JDownloader.jar -norestart
The installation takes some time, loads various updates and must therefore be started again after completion. Use the up arrow key to repeat the last command you ran.
Once everything is installed, you end up in a very, very minimalistic setup screen. Enter "Y" and confirm with the Enter key. Now you will be asked for the email address for your MyJDownloader account. This is followed by your password. Also confirm with Enter so that the setup process continues.
From now on, JDownloader is already running in the background on your NAS. You can now log in via MyJDownloader and continue the configuration there. It is very important that you change the download path, otherwise your system disk will be filled and your Disk Station will be smeared.
In the MyJDownloader interface, click "Settings" and select a folder you have shared on the NAS in the "Default Download Folder" field. The important thing here is that guest access to this folder is allowed so that JDownloader can read and write here.
If you are not sure, it is best to simply create a new folder of your choice, switch to the "Permissions" tab and check the "Read/Write" column in the "guest" line.
Start JDownloader automatically
Now that your JDownloader is running, you can also have it start automatically at system startup. All you need is a small script that runs at system startup. Reconnect to your NAS via SSH and log in as the root user. Switch back to the JDownloader path:
cd /volume1/@appstore/JDownloader
Create the script to automatically start the JDownloader app using Java called start.sh:
echo -en '#!/bin/bash\ncd /volume1/@appstore/JDownloader\njava -jar JDownloader.jar &' > start.sh
Set the permissions for the file you just created:
chmod a+x start.sh
And then use the ls command to verify that the file was created successfully.
Then open the control panel in DSM7 and call up the task scheduler. Click on the Create button, select "Triggered Task" and "Custom Script". Give this task a name, for example "Start JDownloader", making sure the event type is set to "Startup" and you run the task as "root". If these parameters are not already preset, you must change them before you save the task.
Finally, click on "Task Settings" and add the following line in the "Custom Script" area:
sleep 60 && /volume1/@appstore/JDownloader/start.sh
With this command, you delay execution by one minute so that sufficient resources are available when the system starts and only then does the JDownloader app load in the background.
Keywords
JDownloader NAS Server Synology

