
Thomas Armbrüster
The Notes app is the electronic equivalent of index cards and sticky notes and is much more powerful.
You can remember a lot, but not everything. To prevent information from being lost, it is usually written down. Using a Mac instead of paper or index cards provides a powerful tool for collecting information and thoughts with the Notes app. The program can be used not only to save texts, but also images, videos, sound files, websites, documents and map sections. In addition, you can search the stored information and store it in folders.
Enlarge Notes can also be used to scan documents on the iPhone or iPad.
Another advantage of Notes is the collaboration with iPhone and iPad, as long as you enable Notes for iCloud. On the one hand, the information can be synchronized with these devices, on the other hand, documents can be scanned with the iPhone or iPad or photos can be taken and stored in notes. To do this, create a new note and then click on the "Photos" icon in the toolbar. In the menu that appears, select "Scan documents" or "Take a photo". A drawing can also be inserted into a note, which is particularly interesting on the iPad with pen support. You can also draw with your finger, but it doesn't look particularly elegant.
Table of contents
Create a note account Create a new note Tables and checklists Add objects to notes Share notes Manage notes Lock notes Use folders Search and find Share notes for editing Alternatives to notes
Also read: iPadOS 14.5: Handwriting recognition Scribble now in German - scribble
Create an account
Notes can be saved in different ways: In an iCloud account, in the email provider's account if the provider supports notes, and locally on the Mac, the iPhone and the iPad. However, the email provider's note option offers far fewer options than iCloud and local notes. It is better to limit these to text and images. As long as Notes are not set up for iCloud or an email account on the Mac, the system automatically enables local notes. The local account is deactivated as soon as you set up an email account or iCloud and activate the notes. However, the local account can be reactivated in the Notes settings by ticking "Activate the 'On my Mac' account". Similarly, activate “On my iPhone/iPad account” in the Notes settings on iOS.
In addition to iCloud, Notes can also be used with an email account, albeit with fewer options.
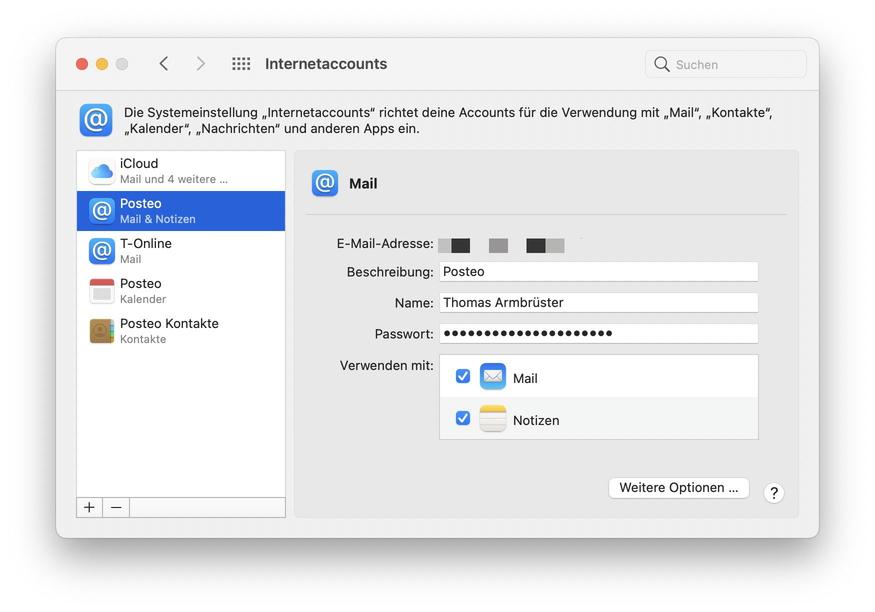
To turn on notes for an email account on a Mac, open Internet Accounts preferences. There you mark the mail account on the left and on the right under "Use with" the notes for this account. In iOS, the notes for an email account can be changed in the settings under "Mail > Accounts" for the respective account. You can turn on the notes for iCloud in the “Apple ID” system settings or under “Internet accounts”. All accounts are listed on the Mac in the program's sidebar, local notes appear under Local. You mark the desired account to create new notes or view existing ones. On the iPhone and iPad, the accounts are listed in the start window.
New note
You can create a new note either by clicking on the relevant icon (square with pen) in the program toolbar or by using Command (⌘)-N. If you have multiple accounts, the new note will be created in the account highlighted in the sidebar. The Default Account preference in Notes settings applies only to Siri. The account set there is used when you create a new note with Siri. The New Notes Start With option, also in Preferences, determines how the first line of the note is formatted, affecting only the iCloud account and local notes. For notes from an email account, the heading is always in text format. Also, for these notes, the Text Style icon in the toolbar is inactive, but the font options from the Format menu apply. The program takes the first paragraph of a new note or the first words of the text for the designation in the list of notes. It therefore makes sense to always write a short descriptive text or keyword first and then type in the text or paste it from the clipboard after a line break. Images contained in the text are also inserted. If the copied text comes from a website, the links contained there are still active.
Enlarge Notes uses the first paragraph of text as the description in the notes list.
Tables and checklists
Tables and checklists cannot be inserted into notes of an email account. The icons in the toolbar responsible for this are deactivated in this case. For iCloud and local notes, add a table using the table icon. The table initially only has two columns and two rows. To add more rows or columns, click in a cell and then make a secondary click (right mouse button) on the icon with the three dots (active point) that appears to the left of the row or above the column. Rows or columns can now be added or deleted in the drop-down menu. New lines are also created if you press the line break after entering a text or a number. If you click on an active point and keep the mouse button pressed, you can move columns or rows within the table with the mouse. When entering text or numbers, you can use the tab key to move from cell to cell. Pressing Tab after entering text or numbers in the last cell adds a new row. You can also copy a table in Numbers or Pages and paste it into a note. Formulas are lost, the values are accepted.
Enlarge Tables can be inserted into a note using the table tool or imported from Pages or Numbers.
The circle symbol with a tick is responsible for the checklist. After clicking on the symbol, a marking button is inserted into the note. Next to it, the text insertion point flashes and you type in the text. A new marking button is created by pressing the line break. To complete the list, briefly press the line break twice, then the last marking button disappears again. Then you can continue writing normally. A checklist can also be converted into another list format. To do this, mark all lines, click on the font symbol in the toolbar and select one of the three list formats available there. You can return to the checklist by marking the list and clicking the checklist button in the toolbar again. You can use the "Move list object" command in the context menu of a list entry to move it up or down. In the numbered list, the number is automatically adjusted in each case. A checklist can also be moved with the mouse, for which you click on the circle symbol and move it. If you mark checklist items to mark them as completed, these items can be automatically moved to the end of the list. For this purpose, a dialog window opens the first time in which sorting is activated. Or you can activate "Sort marked entries automatically" in the settings of notes.
Enlarge With the help of a checklist, you can keep track of things that still need to be done in notes.
Insert objects
In addition to text, spreadsheets, and checklists, local and iCloud Notes can also include images, movies, music files, PDFs, text and Word files, maps, web pages, and iWork program files. Attachments from different sources are also possible in a note. Files can be dragged and dropped from the Finder into a new note, and images can also be dragged directly from Photos into a note. If several objects are inserted into a note, the list of notes shows how many attachments or images are in the note. You can use the context menu to choose whether images are to be displayed large or small in the note. Add links to a web page either by dragging and dropping them from the browser's address bar, or by copying and pasting the URL into the note. Dragging a link from the Safari, Chrome, or Edge address bar into a note displays a thumbnail, the article title, and the website address. With Firefox and when pasting a copied link, only the address of the website appears. In both cases, a double-click opens the respective website in the standard browser. If the iCloud account is activated, you can also use the mouse to drag files and images to the Notes icon in the Dock in the Finder. A new note will then be automatically created in iCloud.
Enlarge A note can also contain several different files.
Attaching objects does not work well in the notes of an email account. Notes with attached files are not displayed at all on iOS, and links to webpages are no longer clickable on iOS. Only with pictures and text there are no problems. With e-mail accounts, you should therefore limit yourself to text and images in order not to experience any surprises.
Enlarge Shortcuts originating from Safari, Chrome or Edge appear in the note with a small preview.
Share
The macOS "Share" feature makes it possible to transfer files from compatible applications to other applications, including Notes. You don't have to look for the objects in the Finder and drag them into a note. In the "Extensions" system preferences you can specify whether notes should be activated for the sharing function. Among others, Pages, Numbers, Keynote, Safari, Preview, TextEdit, Photos and Maps are sharing with notes.
Enlarge With the share command, objects can be transferred directly to notes from compatible applications such as photos here.
In Safari, Preview, Maps, and Photos, you'll find the Share icon (a square with an upward-pointing arrow) in the toolbar, and the Share command in the File menu and context menu. Pages, Keynote and Numbers have a "Share" menu item where you select "Send a copy". You have to add the toolbar icon (send a copy) yourself, it is not activated by default. Textedit has only the File menu command. Programs from other developers also support sharing, such as Nisus Writer. Here the share command can be found in the "File" menu, as with textedit. The shared documents are inserted into the note as an attachment and can be opened with a double-click.
Enlarge When passing to notes, you can either paste the object into a new note or into an existing one.

For maps, the note shows a small map section and the address of the selected location, double-clicking opens the large map in the map app.
If you invoke the share command in one of the compatible applications and select "notes", a window will open in which you can add a text that will then serve as a heading in the notes list and specify where the information is stored. You can first choose whether to save the items locally or in iCloud, provided both options are enabled. You can then either set “New note” as the target or select an existing note. The shared document is then attached to them. If you have created folders in notes, you can select one of them and then create a new note there or attach the file to a note in the folder.
Manage notes
The order in which the notes are arranged is determined in the program settings. You can choose between creation date, editing date or title of the notes. The notes can be displayed as a list or as a gallery for a local and iCloud account. To select the view, click on one of the two left icons in the toolbar or use the options in the "View" menu or the keyboard shortcuts displayed there. If you want a note to always be at the top of the list or as the first item in the gallery, pin it. This can be done via the context menu of the note or alternatively in the list view with a swipe movement on the trackpad and the Magic Mouse to the right. Then the "Pin" button will appear with a pin icon, which you click. You can also attach multiple notes. To detach a pinned note, proceed in the same way and click on the "Detach" button. Pinning is not available in an email account.
Enlarge In the preferences of Notes you determine how the notes should be sorted.
To delete a note, use the context menu or swipe left in list view to reveal the Delete button. Alternatively, click the trash can on the toolbar when the note is highlighted, or press the backspace key. You can also mark several notes and then delete them using the trash can icon or the backspace key. Deleted notes are moved to the Recently Deleted folder and remain there for 30 days. This applies to the local account and to iCloud. Notes in an email provider's account are removed immediately. To remove one or more notes from the "Recently Deleted" folder, mark them in the list and delete them manually. The Recently Deleted folder automatically disappears when it no longer contains notes.
Enlarge Important notes can be pinned in iCloud, they then appear at the top of the note list.
Lock notes
Notes stored in iCloud or locally can be locked with a password as long as they don't have attached files, PDFs, video or audio files. Notes with images, web links, and map locations, on the other hand, can be locked just like text notes. The password applies to all locked notes and can be created in the program settings by clicking on “Set password”. To lock a note, click the lock on the toolbar. If you have not previously set a password, you will now be prompted to do so. Locked notes are marked with a lock symbol in the note list and the content is hidden in the preview area or in the gallery view. If you close the app, all locked notes are automatically closed and remain hidden after restarting the program.
Enlarge As soon as you close locked notes, their contents are hidden and can only be shown again by entering the password.
To close all locked notes immediately, click the lock icon in the toolbar and select "Close all locked notes" from the drop-down menu. To open a locked note, click the Enter Password field and type in the password. This will also reopen any other locked notes. If you have marked "Use Touch ID" in the preferences of notes on a Macbook with a fingerprint sensor, unlocking can also be done with one finger. You first mark a locked note and then place your finger on the sensor. The protection can be removed again using the "Remove protection" command in the context menu of a locked note. You can also find an identical command in the drop-down menu of the lock icon in the toolbar. In the program settings, you can use "Change password" to replace the old password with a new one, which affects all previously locked notes. If, on the other hand, you reset the password, all previously locked notes retain the old password.
Enlarge Notes with file attachments cannot be locked with a password.
Use folder
In order to keep track of many notes, it is advisable to create folders. By default, only the Notes folder exists in each account. If you have multiple accounts, first select the account in which the folder should be created and then click on “New Folder” at the bottom of the sidebar. The command can also be found in the context menu of the sidebar. Once you create a folder, Notes automatically creates the All [account name] folder as well. This lists all notes of the respective account.
Enlarge In order to keep track of many notes, you create folders and subfolders.
You can also create subfolders, except in the "Notes" and "All..." folders. To do this, first create a new folder and move it to another folder using the mouse. To create additional subfolders in the same directory, mark an existing subfolder and create a new folder. Clicking on the triangle in front of a folder shows the subfolders and hides them again. To rename, either use the appropriate command from the context menu, or select the folder and then click on it again. The text can then be edited, with the exception of the "Notes" and "All..." folders.
Enlarge If you delete a folder, the notes are also deleted, but first end up in the folder with the last deleted notes in iCloud.
A folder can be deleted again, also with the exception of "Notes" and "All...". To do this, mark it and either click on the recycle bin icon in the toolbar, press the backspace key on the keyboard or use the delete command in the context menu. In the dialog window that opens, you still have to confirm the deletion process. If there are notes in the folder and its subfolders, they're placed in the Recently Deleted folder on iCloud and local accounts. If you have an email provider account, the notes will be removed immediately. Notes and folders can be dragged from one folder to another with the mouse, even between the local and iCloud accounts. Alternatively, you can use the "Move" command in the context menu of the note and select the target folder there.
Alternatives to notes
If the functionality of notes is not sufficient, you have the choice between several alternatives. A much-used note-taking application is Evernote. There is a free basic version, which requires registration, a premium version and a business version, which is primarily optimized for working with multiple users. Apps for iPhone and iPad are also available. OneNote is available from Microsoft for the Mac as well as for iOS and iPadOS. You can find them in the respective app store. OneNote is also part of Office 365. The program is free, but you need a Microsoft account. The notes are synchronized between the different devices via the account. Another full-featured note-taking alternative is DevonThink. The program is available in the variants "To Go 3" for iOS and iPadOS as well as "Standard", "Pro" and "Server" for the Mac. The programs offer much more than just managing notes. If you don't have any problems saving your notes on Google and also use Google services such as Mail, Calendar and Documents, you can use Google Notes (Google Keep). You manage the notes on the Mac in the browser, for the iPhone and iPad there is an app.
Search and find
Clicking on the magnifying glass symbol at the top right displays the field for entering the search term. Some general searches are already predefined and appear automatically. You can search for notes with attachments, scanned documents or locked notes, among other things. If you type in a search term, the title and text of a note and the name of an attachment are searched for. All search results are listed in the note list, first the top hits, then the hits in the texts and then the attachments. If you have more than one account, you can click on the magnifying glass icon to choose whether to search in all accounts or only in the current account.
Enlarge The search field can be used to search the text and the names of the attachments for the term you have entered.
There is also a way to display all attachments and images saved in Notes in one window, sorted by type. Only the objects stored locally and in iCloud are displayed. To do this, in the menu “View > Show attachment overview” on. If you use this option frequently, you can add the "Attachments" icon to the toolbar, which you can do by selecting "Customize toolbar" from the toolbar's context menu. In the attachment overview, mark one of the categories at the top of the window to display all associated files. You can use the context menu of an object to display it in the associated note or as an overview or open it in the associated program. In addition, attachments can be saved to any directory on the Mac or renamed. Websites and maps can only be renamed, not saved. You can close the attachment overview again via the “View” menu or by clicking on the attachment symbol.
Enlarge In order to get an overview of all attachments saved in notes, display the attachment overview.
Share note
Notes stored in iCloud can be shared with other users who also have an iCloud account. To share, highlight the note and click the share icon (a circle with a stylized head and a plus sign) on the toolbar.
In the window that opens, select how the invitation should be sent. This can be done by e-mail, message or airdrop, or you can send the link, also by e-mail or to a telephone number. The recipient will receive an email or message notifying them of the shared note, which they then double-click to open and edit in the Notes app. To stop sharing a note, highlight it, click the share icon in the toolbar again, and click Stop Sharing in the window that appears.
Enlarge A sticky note can include images and links to web pages in addition to text.
The note
The sticky notes are the digital equivalent of the Postit note. Sticky Notes can hold both text and images and are automatically displayed when you start the program. In order not to miss a note, take the program in the system settings “User & Groups" in the list of login items by clicking on the plus symbol and selecting the program. It will then open automatically when the Mac starts up or when the user logs in, displaying any existing sticky notes.
To create a new sticky note, use the New Note command in the File menu or Command (⌘)-N. Then you type a text or paste the text copied to the clipboard. Images are either drag-and-dropped or copy-pasted into a sticky note. A sticky note also includes links to web pages that are clickable. Either you drag the URL from the browser's address bar into a note or copy the address and set it with "Edit > Add Link" in a sticky note. The notes are saved automatically.
A sticky note can be colored, there are six variants available in the "Color" menu. The text can be formatted via the "Font" menu, and the spelling checker can be found in the "Edit" menu, among other things. So that not too many notes fill the screen, you fold the notes with a double click on the respective title bar. This is labeled with the text of the first paragraph. Particularly important notes can be superimposed on top of all other open windows on the screen, which can be done in the "Window >" menu. Floating Above” enabled. There is also an option here to make a sticky note transparent.

