
Peter Müller, Ines Walke-Chomjakov, Kris Wallburg
How to create screenshots with the iPad, the Apple Watch or the iPhone.Incidentally, the procedure is child's play!
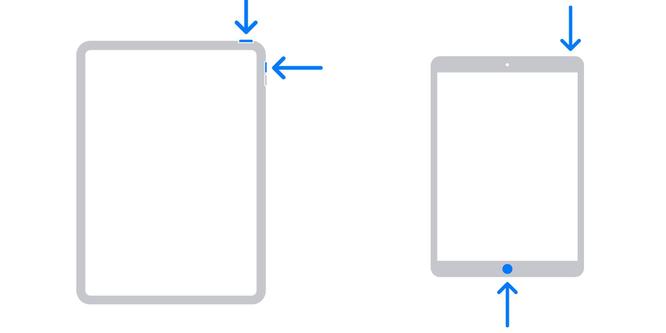
With the on-board equipment of iPados you easily manufacture the screenshot by pressing the home button and the on/off switch at the same time.The new iPad-Pro models lack the home button, instead you press the "Lauter" button on the side together with the on/off switch to take the photo.The one/off switch is still attached to the top of the new models.This is the whole trick, only these two buttons.The screen becomes briefly white, a sound sounds like a camera closure.
Enlarge how to make a screenshot on the iPad depends on whether your iPad has a home button.
© Apple
Photographing whole page
Do you want to present someone a complete page on the web on a screenshot?So far, for this purpose, they had to take several pictures and laboriously put them together in an image editing program - or leave them to their counterpart, or to "stab" them in the head.

From iOS 13 and iPados 13 this is more convenient, but so far only with Apple's own browser safari.Because you have triggered the screenshot - using the method described below - and taps on the photo floating on the screen, you can now get into a new view in which you can not only cut the image or to be given comments.Because now there is also the option to have the "whole page" recorded by the iPhone or iPad.To do this, tap the corresponding button on the top left (see screenshot above this box).Unlike the screen content, which iOS stores as a PNG, the system creates a PDF from the whole page.
The screenshot recorded is now displayed on the screen.Various tools are shown at the bottom of the screen with which you can edit the screenshot directly.You can also send the screenshot directly, e.g.B. by email or with apps such as WhatsApp, or another Apple device with airdrop.You can crop the screenshot in this window.At the edges of the screenshot you will find markings with which you can reduce the image section as desired.
To align the screen photo within the circumcised area, simply use two fingers and move the screenshot until the neckline fits.Using the "finished" button on the upper left edge of the screen, you can finally save the screenshot or even reject them directly-with screenshots with which you only want to document something briefly, this is probably the most obvious option.If you save the image, it ends up in the photo app of the iPad and not only in the collection of all photos mentioned not only in the camera role mentioned, but also in the intelligent album "Screensfomotfotos intended for screenshots on iPhone, iPad, Apple Watch and Mac" - but still gets out of hand and in the view" All photos "only disturb the screenshots.Alternatively, iOS still offers a way to save the stained photo in its own iCloud file ornament.
Film the screen content
Often it is not enough to only take a picture of the screen if you document a process, for example, is a moving picture.This also supplies the iPad and iPhone on -board resources, but you have to activate them first.Because in the Settings app, it is important to add the recording function to the control center.The rest is then quite simple: a swipe of (usually) at the top right and all options of the control center are ready, a tip on the recording symbol starts the recording after a three -hour countdown.As a rule, this is not enough to get the event to be documented freely, but the superfluous frames can then be easily removed in the photo app in which the iPhone saves the recording.This can be ended with a tip on the red surface at the top of the screen, which signals that an recording has just started.
You can find detailed information on screen recordings on iPhone and iPad here.
Screenshots from the iPhone, transferred iPad to the Mac
If the Mac is from a newer generation, Airdrop can be striven for, the wireless technology transfers the photos or screenshots into one of the Finder folder on the Mac.From then on you can edit, send or archive them.However, the matter becomes a bit more difficult without Airdrop: Sure, mail or imessage would also do, now this method requires additional administrative effort.It is easier and faster when you connect the iPhone or iPad to the Mac and start preview.Use the menu bar "Filing" Select "Import iPhone/iPad".The dialog window allows saving in different folders, the simultaneous deletion from the iPhone, the list view also allows a detailed view of the technical data such as aperture, ISO, location, etc.
Transfer iPhone screenshots without saving them in the photo apps
Since iOS 11 there has been an elegant method of taking up the iOS screen, sending the image of it and deleting it again without filling the photo app with it.This goes over the editing menu.After the screen photo has been recorded, tap the preview of it in the lower left corner.You can send the picture over the arrow up, but also edit it.The tip on "Finf" brings two options: "Secure in 'securing photos" or "delete".After the tip on "Delete", the picture disappears in the trash and is not saved in the photo app.

